Friday, 10 February 2023

 An Audacious Project

H.M.S. Audacious at War 1939 – 45


H.M.S. Audacious is not a name that is well known in WW2 naval history, largely as she is a totally fictitious ship, bought to life to portray the Fleet Air Arm at war in miniature from 1939 to 1945.

Audacious is a half-sister ship of H.M.S. Ark Royal, but with a fully armoured flight deck as found on the slightly later Illustrious class carriers. She will make her presence felt in many of the theatres of war that the RN fought, from the icy seas off Norway in 1940 to the heat of the Pacific in 1945. While in the course of her service she may be damaged and out of action for some time as a result of enemy action, Audacious herself will survive the war to allow her service to be recorded up to the end of 1945.  

She is regarded as the FAA’s ‘cutting edge’ carrier by the Admiralty, operationally trialing many new aircraft and tactics throughout the war before they go to sea with the rest of the fleet.

Throughout her service her air group will consist of 3 main squadrons:

No 839 Fighter Squadron

No 843 TBR Squadron

No 844 TBR Squadron

None of these squadrons were actually commissioned, however their numbering does fall amongst contemporary FAA squadrons which were formed during WW2.

Audacious’s story will be told though the eyes of the CO’s own section in 839 Fighter Squadron, with the other squadrons playing their parts as required. I am using my own simple home baked air combat rules to cover the aerial actions along with Joe Lagan’s “Squadron Forward” from TFL to help fill out the narrative and events between missions.

Rather than using scripted campaign sequences that I have made in the past for the Zero shotai I depicted in Operation C and the Aleutians I will run with Squadron Forward’s mission system, but pick a certain number of missions per campaign that reflect each particular campaign. I will produce my own mission allocation tables for each campaign based on the actual activities that the FAA was involved with during that time.    

The ship’s first commission began at Portsmouth in July 1939, just as Europe is about to plunge into war. She was destined for the Home Fleet initially and after an intense work up she was declared operational, based at Scapa Flow.  Her war began in earnest in early April 1940 when the Germans invaded Norway…..

My initial time line for the various campaigns is as follows:

Time

Campaign

Air Group Composition

April 1940

Norway

Skua/Sea Gladiator/Albacore

July 1940 – March 1941

Force H in the Med

Skua/Fulmar/Albacore

June 1941

Arctic – Petsamo

Fulmar/Albacore

November 1941 – May 1942

Indian Ocean

Sea Hurricane/Albacore

June - August 1942

Med -Operations Vigorous, Pedestal and Torch

Sea Hurricane/Albacore

Early – Mid 1943

Pacific with USN

Corsair/Seafire/Avenger

July 1943

Med - Operation Husky

Seafire

1944 – 45

Indian Ocean/BPF(?)

Corsair/Seafire/Avenger


There are also opportunities for the Air Group to participate in operations ashore if Audacious herself is out of action – Home Defence during the Battle of Britain in 1940, Malta and North Africa in 1941 and early 1942 and Ceylon in April 1942.

There’s a fair bit to achieve before the campaign can begin. While I have all the necessary aircraft models most of them still need to be painted up and have decals added. I also need to find some suitable locally available flight bases, I have a couple of ideas but we’ll see where that goes over time.

Thursday, 29 December 2022

Work in Progress

Some pictures to show a bit of end of year progress on my several on-going projects......2022 has cetainly had its challenges both real world and gaming wise for me, but its ending on a fairly positive note gaming wise. 

Without further ado here are some of my more recent works:

Firstly some Pendraken 10mm Irish Confederate pike and shot units for refighting the Battle of Benburb 1646 using For King and Parliament rules. The figures were painted, excellently as usual, by Paul R.

I based them up and added the flags labels etc. We are looking to refight some Irish battles in 2023 now that we have finished the Celtic Fringe "house rules" for FK&P and are putting the finishing touches to our take on Montrose's campaign in Scotland in 1644 - 45.  

Onto a 1944-45 Soviet Tank Corps Motorcycle Battalion for Spearhead using lease-lend equipment. At the top are 2 Heroics and Ros 1/300th scale SU-57's - a Soviet 76mm AT gun mounted on a American M3/5 halftrack. Below them are 3 Baccus 1/300th scale M3A1 Scout cars carrying a SMG armed recce company - they're very nice models but a considerably bigger compared with the H&R halftracks, which I believe use the same, or very similar chassis to the wheeled scout cars? 

A shot of the whole battalion, rounded out by the HQ and a Tank company of British lease-lend Valentine IX tanks and another company of SMG armed recce company, this time mounted on motorcycles.


Next up is some 1980's Danish Army kit. Firstly 1/300th Heroics and Ros Danish Army Centurion Mk 5/2 DK's for Modern Spearhead. These are various company sized units (10 tanks per company) that make up part of the tank and mechanised battalions of one of the mechanised brigades. Up until 1990 the two "regular" Mechanised Brigades of the Zeeland Divison were equipped with these upgraded Centurions, while the tank companies in the better known Jutland Division were equipped with German manufactured Leopard 1A3's (4 companies of which are on the bench to do next). 

We are looking at playing a MSH game in February 2023 depicting the Polish 6th Parachute Division (a brigade only actually) dropping into Zeeland in the opening days of a hypothetical 1985 "Cold War goes hot" scenario and holding until relieved by follow on Polish and East German mechanised forces.  

A closer view of the very nicely sculpted H&R model with the laser rangefinder hood next to the main 105mm gun.

Danish brigade support weapons - Jeep and M113 mounted TOW ATGW's in front then a company of Hamlet (US sourced Redeye) SAM's with Landrover transport and a full squadron from the Corps level recce battalion behind them. Equipped with M41's, and from the late 1980's updated M41 DK1's which you can see at the top left, another very nice fairly recent H&R model.


The recce squadron close up, with M41's (and M41 DK1's for late 80's games in the back) on the left with 3 recce sections in M151 Jeeps on the right with a M113 mechanised platoon and M125 mortar vehicle behind to give a bit more solid support if required once contact has been made.

And that's it for now. Thanks for visiting my blog. For me 2023 is going to be a year of (at least trying to!) finishing off existing unfinished projects....though like many gamers out there I'm sure its a resolution they make most years! 

Have a good 2023 both gaming and real world wise.


Monday, 14 November 2022

Battle of Justice Mills - September 13 1644


To: The Committee of Estates
From: Lord Balfour of Burleigh 

The Rebel Montrose was bought to battle outside Aberdeen on Friday the 13th day of September of the year 1644 by our forces defending that fair city from the King's men, being mainly drawn from the city garrison as well as both local men of quality and their diverse troops of horse and the Aberdeenshire militia called out in defence of their homes. 
 
The battlefield was near the outskirts of the town and took place around the Justice Mills and a small valley in which flows the How Burn. The Covenanters occupied the high ground to the left while Montrose's army deployed on the other side of the valley. 
 
The Covenanter left wing is made up of 5 troops of unbrigaded horse, 3 lance armed and 2 pistol armed. On the high ground to their right is Burleigh's own regiment, the city militia and no less than three units of untried Aberdeenshire militia. Montrose's Irish brigade can been seen in the distance deployed initially in the centre of the Royalist line. If you have followed my previous battle reports you will remember that we use the grid based "For King and Parliament" ruleset (which are a very good set of rules) and 10mm figures, mainly from Pendraken Miniatures.

The Covenanter right flank showing the Upper and Lower Justice Mills and Sir John Forbes's small cavalry brigade as initially deployed and Forbes's Regiment in reserve in the rear.
     
The action opened with a thunderous cannonade, which happily dispersed a small party of Irish picked men (a unit of forlorn hope). Montrose and his remaining Irishes, organised into three regiments of musket armed troops, did then maneuver to oppose our left flank, while the other rebels did initially merely observe our forces arrayed before them on the hills around the Upper and Lower Mills for the most part.
 
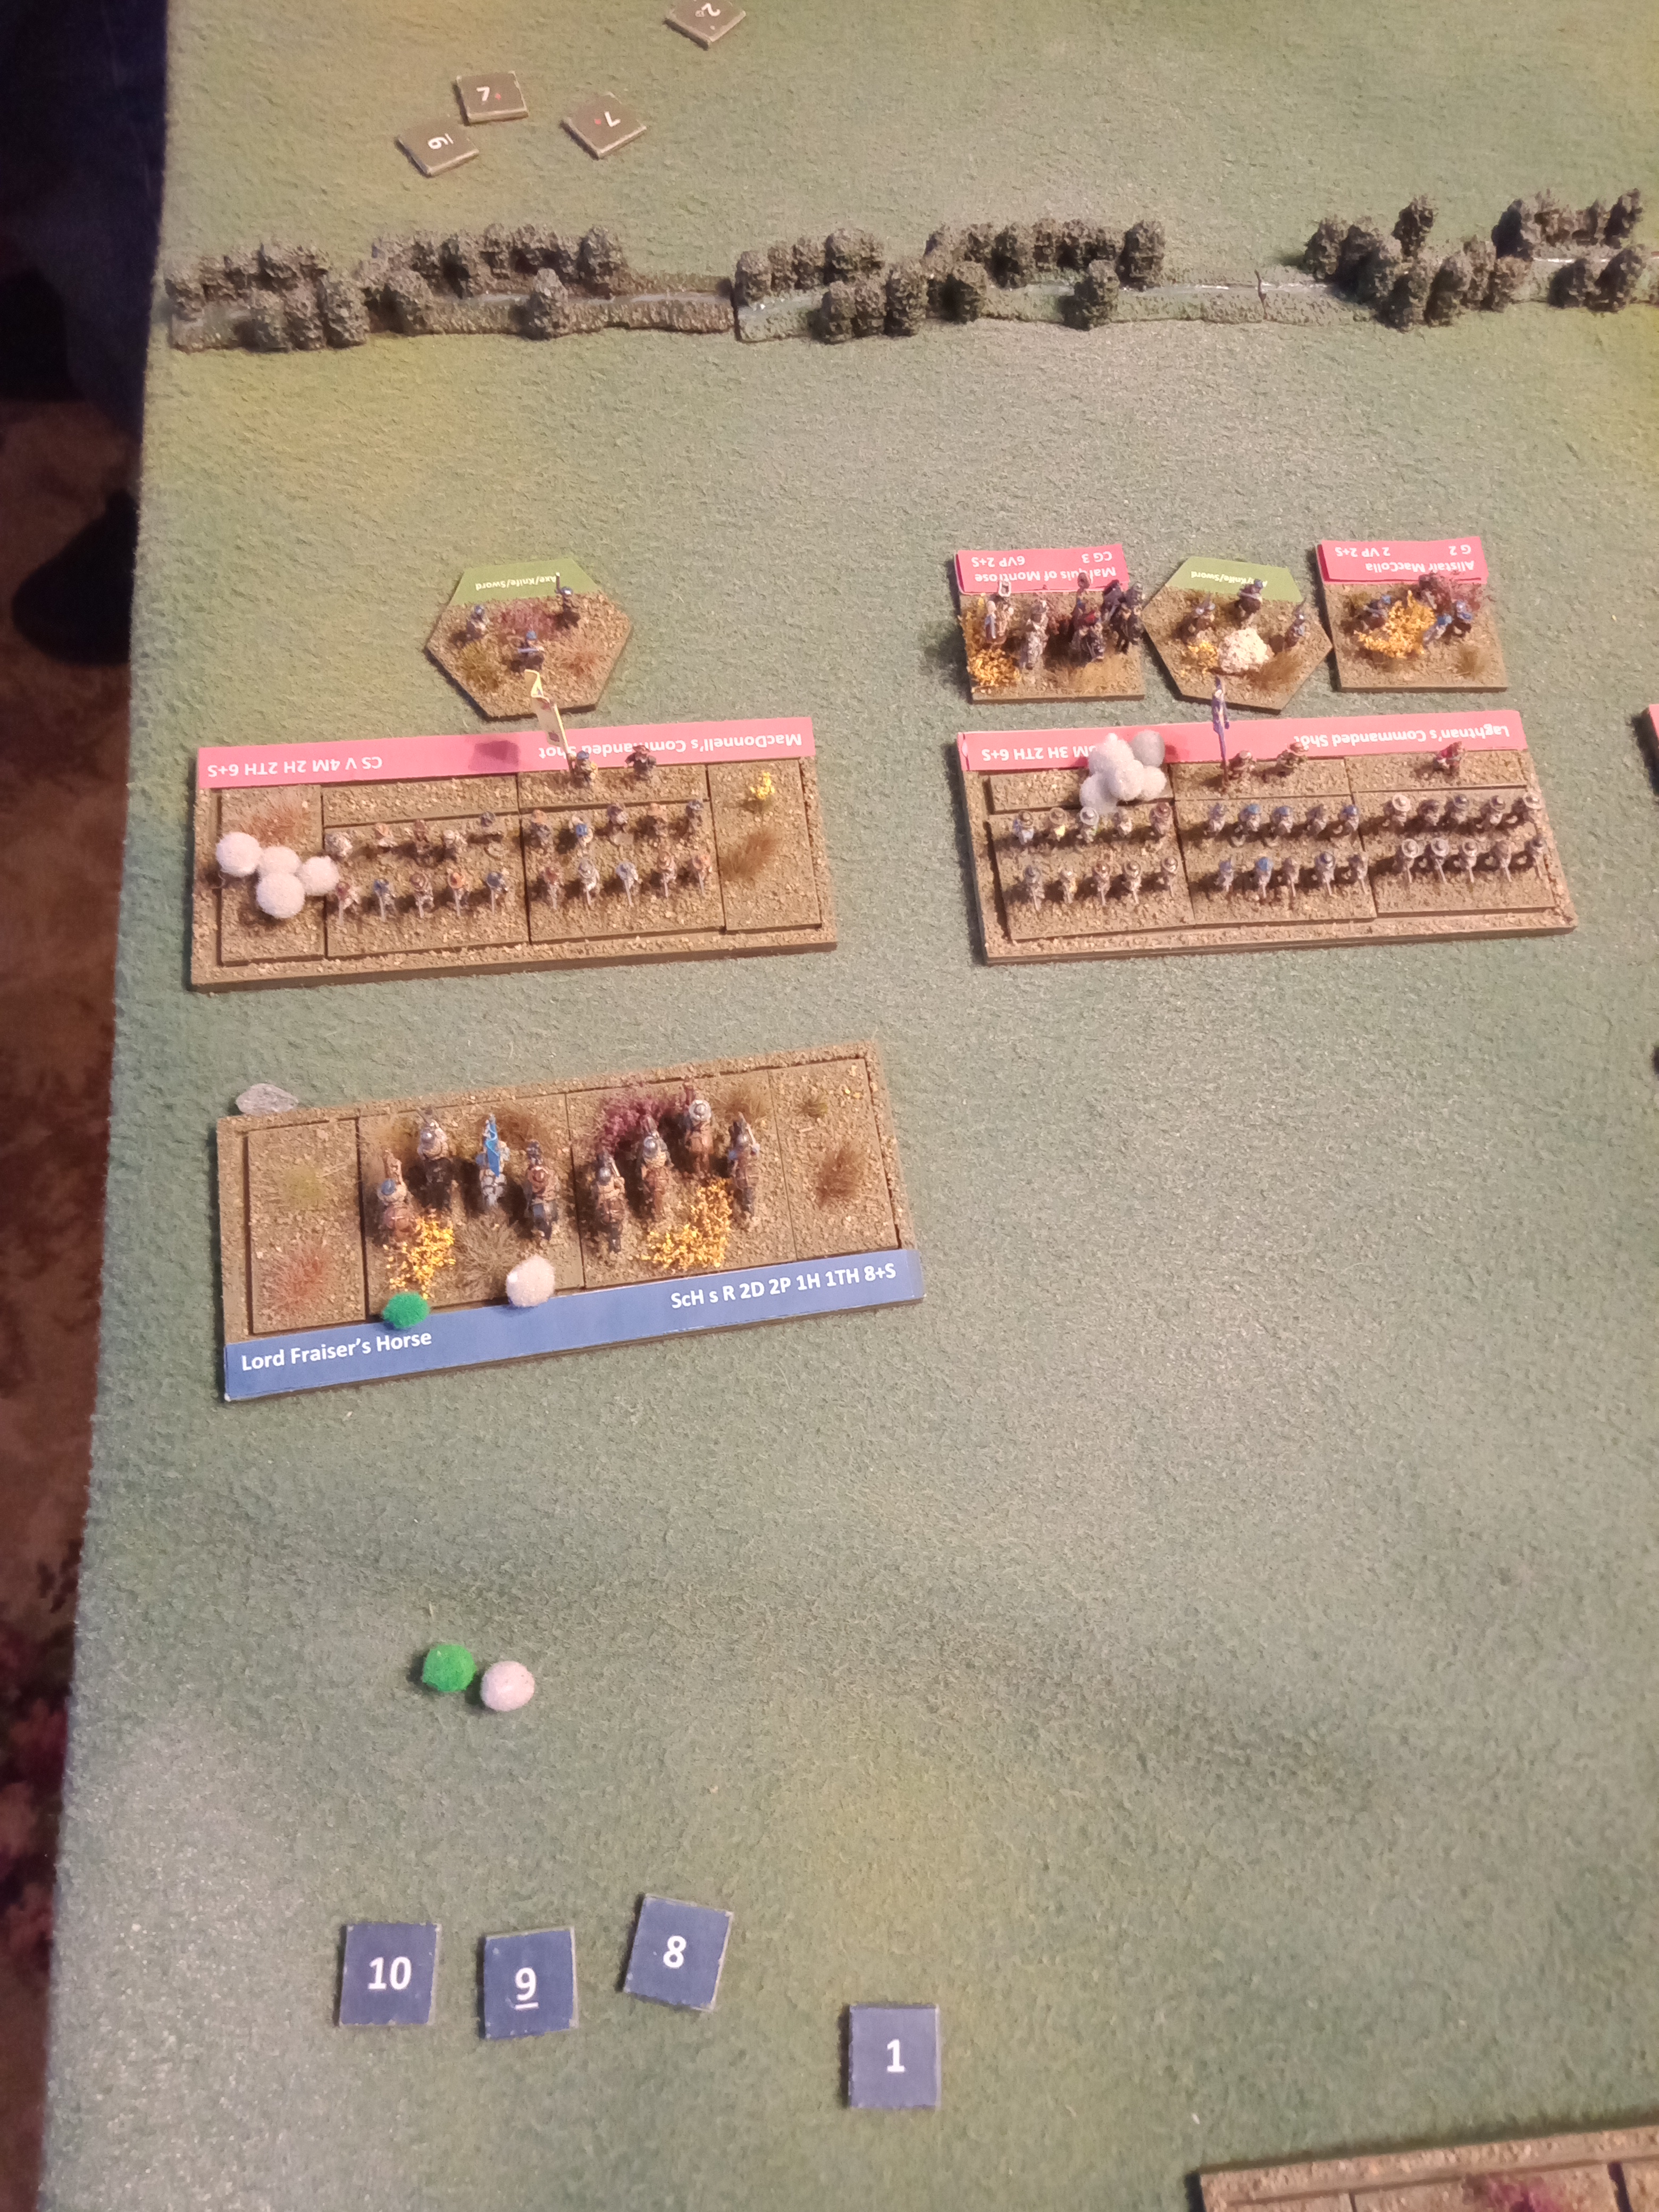
My Lord Burleigh did try in vain to manuvere what infantry he could to oppose the rebels, and our troops of horse of that wing, under diverse command, did of necessity individually bravely close with the rebels and engage them with lance, pistol and sword in hand to hand combat. Despite a fearful charge by Lord Fraiser's pistol armed troop of horse which did much execution amongst the Irishes lead by one Colonel MacDonnell and would have seen them off (3 hits!!) the cess of the Irish was with them and, with the assistance of the infamous gael leader Colkitto, who was leading their brigade, they did repulse the charge without disorder (3 saves!!).
 
Lord Frasier's Horse inflicts 3 hits on MacDonnell's unit of Irish cammanded shot (8, 9, 10), enough to remove the unit from the table....But equally spectacularly the Royalists pull 3 chits with high enough scores (7,7,9) to negate all three hits.....  

The double musket fire by the experienced Irish musket men eventually overcame several of our troops of horse which were forced from the field.


A later turn and all three veteran Irish units are still present, with MacDonnell threatening to outflank the remaining Covenanter cavalry on the left flank.  

On our right Sir John Forbes' bravery must be commended as he did eventually lead most of his brigade over How Burn through a hail of fire from the rebel Montrose's own cannons (Lord Alexander Keith's troop of lancers being put to the rout by a unfortunate hit) and engaged a small brigade of rebels under the command of James Hay. Sir John lead Lord Lewis Gordon's troop up the hill and dispersed Nat Gordon's troop of horse by the fire of their pistols alone. However as they did not need to pursue Nat Gordon's men from the field the rebel cannon were able to fire their final salvo at Forbes men who were this time unwilling to stand the fierce bombardment.
 
Gordon vs Gordon - on the far hill Lord Lewis Gordon's Troop charges home uphill into Nat Gordon's small unit of Royalist horse which has already been disordered previously by the Covenanter Artillery unit in the foreground. Lord Lewis's pistol fire was enough to destroy the unfortunate Royalist unit, boosting the Covenanter victory medal tally to 3 in total (impressive eh!!).  However the next turn saw Lord Lewis's unit dispersed by a shot from the Royalist Artillery, leaving Sir John Forbes with only his own troop left to face the Rebels.

So my Lords I must report that the rebels, having seen off our cavalry, claimed victory on collecting 8 victory medals to 3 and eagerly approached the now open city to rapaciously carry off much loot and treasure belonging to its peaceful citizens.

I trust that the rebel Montrose will one day finally be defeated and he should recognise that on that occasion he will be called to answer for his many and diverse actions.        

Yours etc 
Lord Balfour of Burleigh
 
This was another of our test games covering Montrose's campaign in Scotland in 1644/45 using our "Celtic Fringe" house rules. The extra rules worked well and give a good "Celtic" flavour to the main FK&P rules. Next up will probably be the fight at Philiphaugh - can Leslie's experienced troopers finally end Montrose's "year of victories", or will he manage to live to fight another day?