Following the disastrous Battle of Dunbar in September 1650 the King and the remains of the Scots Army fled north into Fife. Cromwell followed, but with winter approaching a long stalemate ensued. Leslie's forces stopped at Torwood near Stirling and dug in, preventing Cromwell from advancing further into Scotland.
The summer of 1651 found the situation largely unchanged, though the Covenanters were desperately trying to raise new units or bring existing ones back up to strength after Dunbar. To break the Scots position Cromwell decided to outflank them by staging a landing at North Queensferry on the Firth of Forth. On 17th July 1651 Colonel Overton successfully landed with around 1600 men and established a bridgehead on the Ferry Hills, just north of Queensferry. By the 20th a further 3000 men, now under the overall command of Major General John Lambert had been ferried across.
The Scots had limited resources available to spare in response to Overton's landing. However, some opposition was encountered from the Scots units in the immediate area of the landings, mainly from Colonel Harie Barclay's Regiment of Foot garrisoned at Burntisland and Lord Brechin’s Horse, which was quartered in Dunfermline, only some 5 miles from Inverkeithing.
On receiving word of the landings Leslie dispatched Sir John Browne and Major General James Holborne with their respective brigades of horse and foot to contain the Commonwealth incursion. By the time they arrived, along with 500 highland levies from Clan McLean, Holborne had a total of around 4000 troops to oppose Lambert's advance.
With the arrival of last of his own reinforcements and the main body of the Scots army now arrayed now just to his north on Whinny and Muckle Hills Lambert decided to attack on the morning of the 20th July 1651.
The site of the battle has seen many changes since the mid-19th century as it is located at the northern end of the various Firth of Forth rail and road bridges as well as being adjacent to the Rosyth naval dockyard. After consulting various early Ordinance Survey maps made before the first railways were constructed (available online through the Scottish National Library site) I came up with this map which adopts the terrain to FK&P's 150mm grid squares (north is to the right):
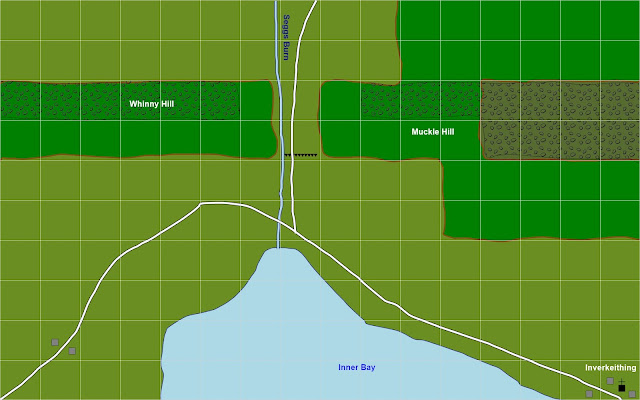
Lambert's force enters from around the south eastern corner, while the Scots deploy on Whinny Hill and north of Seggs Burn (which is treated as a stream). The rear slopes of Whinny and Muckle Hills are treated as broken ground, as is all of the higher slopes of Muckle Hill.
The armies are similar in overall number of Victory Medals, the Scots having 13 to the Commonwealth's 14 as I kept the 40% overall figure for both sides. however, with several veteran New Model Infantry units in Lambert's own brigade the Commonwealth force is significantly larger points wise.
The army lists are as follows; firstly the Scots:
| Unit | Type | Dash | Ammo | T-H | Hits | VPs | Save | Cost |
| Major General James Holborn - Centre |
Commanding
General |
5 | 2+ | 5 | ||||
| MG James Holborn’s Regt of Foot | Musket & Pike, Seasoned | - | 3 | 2 | 3 | 3 | 7+ | 9 |
| Light Gun (Attached) | 2 | 2 | ||||||
| Master of Gray’s Regt of Foot | Musket & Pike, Raw | - | 2 | 2 | 3 | 3 | 8+ | 6 |
| Light Gun (Attached) | 2 | 2 | ||||||
| Sir George Buchannan’s Highland Levies | Highland Levies, Raw | - | 0 | 2 | 3 | 3 | 8+ | 3 |
| Sir Hector Maclean’s Highland Levies | Highland Levies, Raw | - | 0 | 2 | 3 | 3 | 8+ | 3 |
| Colonel Barclay’s Forlorn Hope 1 | Forlorn Hope, Seasoned | - | 2 | 1 | 1 | 1 | 7+ | 3 |
| Colonel Barclay’s Forlorn Hope 2 | Forlorn Hope, Veteran | - | 2 | 1 | 1 | 1 | 6+ | 4 |
| MG Sir John Browne - Right |
Colonel | 1 | 2+ | 4 | ||||
| MG Sir John Browne’s Horse | Scots Lancers, Veteran | 2 | 1 | 2 | 2 | 2 | 6+ | 7 |
| Sir Charles Arnott’s Horse | Scots Lancers, Seasoned | 2 | 1 | 2 | 2 | 2 | 7+ | 5 |
| Earl of Balcarres’ Horse | Scots Lancers, Raw | 2 | 1 | 2 | 2 | 2 | 8+ | 3 |
| Sir Walter Scott of Whitslade’s Horse | Scots Lancers, Veteran | 2 | 1 | 2 | 2 | 2 | 6+ | 7 |
| Lord Brechin - Left |
Colonel | 1 | 2+ | 4 | ||||
| Lord Brechin’s Horse | Scots Lancers, Seasoned | 2 | 1 | 2 | 2 | 2 | 7+ | 5 |
| Colonel Hoffman’s Moss Troopers | Scots Horse, Seasoned | 2 | 2 | 1 | 2 | 2 | 7+ | 5 |
| 32 | 13 | 77 |
And the Commonwealth:
| Unit | Type | Dash | Ammo | T-H | Hits | VPs | Save | Cost |
| Major General John Lambert - Centre |
Commanding General | 5 | 2+ | 5 | ||||
| MG John Lambert’s Regt of Foot – 1st Battalia | Musket & Pike, Veteran | - | 4 | 2 | 3 | 3 | 6+ | 12 |
| MG John Lambert’s Regt of Foot – 2nd Battalia | Musket & Pike, Veteran | - | 4 | 2 | 3 | 3 | 6+ | 12 |
| Col William Daniel’s Regt of Foot – 1st Battalia | Musket & Pike, Veteran | - | 4 | 2 | 3 | 3 | 6+ | 12 |
| Col William Daniel’s Regt of Foot – 2nd Battalia | Musket & Pike, Seasoned | - | 3 | 2 | 3 | 3 | 7+ | 9 |
| Field Artillery Battery | Field Artillery, Seasoned | - | 6 | 1 | 1 | 1 | 7+ | 4 |
| Colonel Leonard Lytcott - Left |
Colonel | 1 | 2+ | 4 | ||||
| MG John Lambert’s Regt of Horse | Swedish Horse, Veteran | 3 | 1 | 2 | 2 | 2 | 6+ | 8 |
| Colonel Leonard Lytcott’s Regt of Horse | Swedish Horse, Seasoned, untried | 3 | 1 | 2 | 2 | 2 | 7+ | 4 |
| Colonel Okey’s Regt of Horse (part) | Swedish Horse, Veteran. Small unit | 3 | 1 | 2 | 1 | 1 | 6+ | 2 |
| Colonel John Okey - Right |
Colonel | 1 | 2+ | 4 | ||||
| Colonel Okey’s Regt of Horse | Swedish Horse, Veteran | 3 | 1 | 2 | 2 | 2 | 6+ | 8 |
| Colonel Leonard Lytcott’s Regt of Horse (part) | Swedish Horse, Seasoned, untried, small unit | 3 | 1 | 2 | 1 | 1 | 7+ | 1 |
| Colonel Robert Overton - Reserve |
Colonel | 1 | 2+ | 4 | ||||
| Colonel Francis West’s Regt of Foot | Musket & Pike, Raw, untried | - | 2 | 2 | 3 | 3 | 8+ | 6 |
| Colonel Edmond Syler’s Regt of Foot | Musket & Pike, Seasoned, untried | - | 3 | 2 | 3 | 3 | 7+ | 7 |
| 35 | 14 | 102 |
A view of the overall battlefield from Inverkeithing with the Scots deployed on the heights on the right and behind the Seggs Burn (Brechin's small cavalry brigade).

They were initially content to remain stationary as Lambert's force marched onto the board. Inner Bay and the narrow peninsula between North Queensferry and Fifeshire means that the Commonwealth forces must carefully manage their force as they attempt to deploy.

The Commonweath players decided that they would mass all their cavalry on their right and attack Brechin's small brigade behind Seggs Burn. This meant some units riding within range of the Scots infantry up on Whinny Hill, who were only too happy to fire into them with musket and the few light guns they had available, causing much damage to Lytcott's cavalry brigade by destroying two of the brigade's regiments!

Lytcott's own regiment was more fortunate, crossing the Burn they clashed with Lord Brechin's lancers, destroying them and then turning to threaten Colonel Hoffman's irregular collection of "Mossers" that had joined the Scots defenders.

Meanwhile the Commonwealth infantry was only able to advance slowly in support. As the opposing cavalry was now either destroyed or committed to the other flank Browne decided to advance off the hill to try and at least slow the enemy infantry's advance.


Okey's small cavalry brigade, following behind
Lytcott loses one unit to the intense Scots infantry fire, but, lead by Colonel
Okey himself his own regiment easily rides down the Mossers and eyes up one of
Barclay's forlorn hopes defending the entrenched gorge.

Meanwhile the Commonwealth infantry has finally been able to advance and so Browne's brigade is forced to attack Lambert's veteran redcoats.

The Scots lancers are unable to break into the Commonwealth infantry dispite multiple attempts and are in return peppered with volley fire by the redcoated musketeers. But it's a contest that they cannot sustain for too long....

Okey easily brushes the small forlorn hope holding the entrenchment across the gorge and gallops in pursuit of the fleeing Scots musketeers towards the Scottish baseline along the track leading towards the northwest.....the exact route that Cromwell had planned Lambert's force should march along to threaten the rear of the Scots main positions at Torwood, near Stirling!

But where is the bulk of Lambert's force? Fortunately for the Commonwealth Browne's lancers have all been seen off so their infantry slowly slog their way up Whinny Hill to confront Holborn's only remaining brigade of largely inexperienced foot. Opposing Sir George Buchannan's raw highland levies is Colonel William Daniel's unit of veteran readcoats, accompanied by Major General Lambert himself. After a short, sharp "push o' the pike" the inveitible happens and the highland levy desolves, making us hand over our last victory medals to the opposition, ending the game and giving the Commonwealth victory, albeit a quite costly battle for both sides in terms of casualties.

Thanks go to Paul R for providing all the Commonwealth units and to all the Saturday night regulars for putting up with playing my scenario (which did prove a quite evenly balanced game) in the usual jocular fashion.