Saturday 30 January 2021

Operation C - Attack on the British Fleet Carriers

Time - 4.30pm April 9th 1942

Scenario - Attack on the British Fleet Carriers - This time the Shotai pilots must escort a strike of 6 D3A2 Val dive bombers as they finally get to launch an attack on the fleet carriers of Admiral Somerville's Eastern Fleet. Due to the Japanese victory achieved in the last scenario the British are aware that they have been sighted and have abandoned any thought of a second attempt at a dusk strike against the Japanese carrier force. Instead they are now retiring at high speed to the South West towards the "secret" anchorage at Addu Atoll. Any defending FAA fighters will be already airborne as the British will be expecting a Japanese strike on the retreating fleet.  

Victory Conditions - In order to attack the targets the two Val dive bomber flights must fly the length of the playing board. Each one that survives inflicts 1D6 points of damage on the target. If the total damage inflicted exceeds 25 points the target is considered to be destroyed and the mission to be sucessful. 


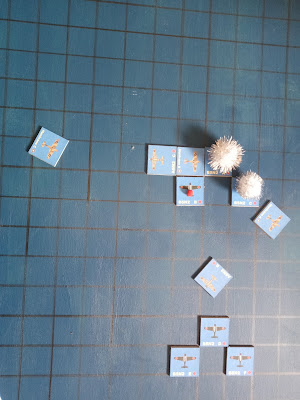
The defending British fighters are vectored onto the strike by the fleet's Fighter Direction Officer....for this scenario the first defending fighters to appear (tope right) are a flight of 3 Fulmars flown by two regular pilots ("A" and "C") and a junior ace (in "B"). The 2 flights of Val's are in the middle and the Zero shotai is bottom left.


The Fulmars are slower than the Zeros in the rules I am using (Fulmars get 1D6 basic movement while the Zeros get 1D6+2), allowing the Zeros to close with them quite rapidly. After some very helpful discussion online with BigJackMac about some of the eariler campaign games I tried once again to play the defending fighter's tactics a little differently by having some of them engage the Zeros while others attack the strike aircraft.


PO1c Watenabe as always leads the shotai by example (I rolled a 6!!)...he barrels into the Fulmars as they attempt to close with the Vals and attempts a front quarter shot at Fulmar "B" (top right) but misses completely (next roll was a 1!). PO1c Ashai and PO2c Fujimi can't match his speed and so veer right to meet the other Fulmars as they close on the first Val flight.


The junior ace flying Fulmar "B" finds he cannot manuvere against his much more agile opponent (kept on rolling very low dice) and soon finds the A6M2 Zero on his tail. This time PO1c Watenabe makes no mistake and the Fulmar's crew is forced to take to the silk after as his 20mm rounds lace the British fighter.

Meanwhile Ashai and Fujimi both attack their British opponents as they pass, but no hits are scored. Val "B" hopefully fires off a burst from its forward guns, but Fulmar "C" 's pilot easily avoids the Japanese fire as he Immelmann's onto PO2c Fujimi's tail.....


And fires a long burst from dead astern of the A6M2 fighter.....which riddles the plane with hits. Fujimi stands no chance as the unarmoured Zero explodes in midair...(centre right). The shotai has suffered its second fatality of the campaign!

PO1c's Watenabe and Ashai can only watch events unfold (bottom right) as simultanously Fulmar "A" makes a firing pass at Val "C", which smokes and dives vertically into the Indian Ocean far below (centre). Fulmar "A" then heads on towards the second Val flight.

The two remaining shotai pilots will have to act fast if they're going to prevent any further casualties amongst the remaining Vals. 


PO1c Watenabe throttles up and pursues Fulmar "A" , latching onto his tail, but at the critical moment his shots fly wide of the mark. Meanwhile PO1c Asahi loops over and fires at Fulmar "C", but misses yet again!. Undaunted the pilot of Fulmar "C" lines up behind Val "B" and scores his second victory in as many minutes as the Val falls to his guns.....

But the Fulmars both still have much more manuverable fighters behind them and their luck is about to change.....PO1c Watenabe turns sharply in behind the British section leader in Fulmar "A" (bottom) and sends a long burst into the fighter which explodes. Fulmar "C" seems to have suffered from target fixation as he doesn't react when PO1c Ashai turns onto his tail and fires....as the crippled Fulmar dives towards the sea the crew somehow manage to bail out. Ashai has in turn shot down PO2c Fujimi's nemisis, but he takes little satisfaction from that knowledge.

No more FAA fighters appear to challenge the remaining Vals as they approach the British carriers from astern. They dive down through a thick curtain of both light and heavy flak to attack an Illustrious class carrier with a white "F" painted on its round down right at the stern....its HMS Formidable. Dispite its violent manuvering the speeding carrier is hit by three 550lb bombs dropped by the veteran Val pilots, causing major damage.  

Result - Partial Japanese victory.....The 4 remaining D3A2 inflict 17 points of damage on the Formidable, enough to heavily damage but not sink the British carrier, which will be out of action for many months to come.        

Kills - PO2c Watenabe -  2 Fulmars, confirmed. PO1c Ashai - 1 Fulmar, confirmed,  PO2c Fujimi - None. Killed in Action 9/4/1942.

The surviving Japanese planes return to the Akagi in the evening twilight and are quickly struck down to the hanger decks below. 

Once recovery operations are complete the Japanese ships turn towards the East to begin the long voyage back to Japan. 

Rumour soon spread that after refitting and leave in Japan the fleet will once more sortie against the Americans in the Pacific Ocean to cover an operation to take a small group of islands to the west of Hawaii, the largest of which is called Midway....         


Thursday 28 January 2021

Operation C - IJN Recce

Time - Noon April 9th 1942 about 100 miles South East of Ceylon

Scenario - IJN Recce - a lone IJN B5N2 Kate is flying on a recce mission to locate the main body of Admiral Somerville's Eastern Fleet has just sighted part of the British fleet South East of Ceylon. Part of the defending Fleet Air Arm Combat Air Patrol (CAP) orbiting over the task force is directed by radar towards the Kate and moves in to attack.

Victory Conditions - The Kate must survive for at least three turns against the British fighters in order to fully transmit its sighting report back to the Akagi. If the Kate survives that long then the sighting report will be considered to have been completed. If it can exit the table then the Kate will considered to have escaped the defending fighter CAP by flying into cloud etc.


Turn 1 - The defenders are three Sea Hurricanes flown by a junior ace ("G") and two regular pilots ("H" and "I") which begin closing with the recce plane. As the Kate's crew spots the fighters bearing down on them the pilot wings over to try and avoid them, the observer gets busy taking oblique photos of the British ships in the distance while the wireless/air gunner frantically begins sending his report.


 Turn 2 - The fighters sluggishly close the distance with the Kate (kept on rolling low dice right through this game....) while the Kate slowly turns away.

Turn 3 - The fighters form up in line formation astern as they continue to approach the Kate from astern. Unmolested by the fighters the wireless/air gunner is able to report that the sighting report has been sent and reciept acknowledged. He then mans his single 7.7mm flexibly mounted machine gun as the Kate desperately tries to reach a huge cloud bank before the fighters arrive (if the Kate can exit the board (2 squares to the right) it will have considered to have escaped). 


Turn 4 - The FAA flight leader in Sea Hurricane "G" (centre) rolls a 1 for movement and so still trails astern of the Kate, but his wingman barrels in, guns blasing from directly astern of the Kate. The Japanese rear gunner empties a full drum of 7.7mm rounds in reply, but no hits are scored (Sea Hurricane "H" rolled a 1, the Kate rear gunner a 2).


Next the third Sea Hurricane "I" roars in from the Kate's left rear quarter just as the Kate is about to enter the cloud bank and another fusilade erupts, but again no hits are scored (Sea Hurricane "I" rolled a 2, the Kate rear gunner a 4).  

Untouched the Kate soon evades the fighters in the clouds and returns to the Akagi where its recce photos are quickly processed to show the ships that have been sighted. They are identified as the battleship HMS Warspite and carriers HMS Formidible and HMS Indomidable.


Result - Japanese victory. The British Eastern Fleet's main body has finally been sighted.

Kills - None

Just after noon on the 9th April 1942, realising that the British fleet's position has been accurately reported, Admiral Somerville concludes that his somewhat hopeful (and totally ficticious) gamble to try to manuvere into position for a dusk strike against the Japanese carrier fleet for a second time has not worked. Immediately he orders a course change to the South West at maximum speed, taking the fleet back to their anchorage at Addu Atoll. This means that the Japanese will only be able to launch one strike against him before nightfall....


Operation C - Attack on Trincomalee 1st Wave


Time - 7.30am April 9th 1942

Scenario - Attack on Trincomalee 1st Wave - The now reorganised Shotai pilots must escort a strike of 6 D3A2 Val dive bombers as they attack designated targets at Trincomalee's port and naval base. Due to the narrow victory achieved in the last scenario the return of the Japanese carrier force has not been detected by the British, so any defending RAF fighters will have to scramble as the raiders appear overhead. This is represented by the defending fighters remaining stationary for 3 turns before they can move to engage the attacking Japanese aircraft. 

Victory Conditions - In order to attack the targets the two Val dive bomber flights must fly the length of the playing board. Each one that survives inflicts 1D6 points of damage on the target. If the total damage inflicted exceeds 25 points the target is considered to be destroyed and the mission to be sucessful.


Initial set up showing the first defending RAF Hurricane flight (top with dice showing turns remaining till they can move), The Vals on the right and the Zero Shotai on the left. I took the photos in a bit of a hurry, not all of them turned out too well sorry... 


Leading the Shotai for the first time since the loss of CPO1c Honda is PO1c Watenabe. Spotting the rapidly climbing enemy fighters he opts to dive down to engage them before they can intercept the Vals.....his wingman PO1c Ashai sticks with him but PO2c Fujimi struggles to stay with them in the dive (I kept rolling one and two for his movement....).   


PO1c Watenabe fires at Hurricane's "G" and "I" from their front quarters (bottom left) as he flashes through the formation but misses both aircraft completely, meanwhile the other members of the flight keep up with him as best they can, well aware that the first Val flight (top right) is now becoming vulnerable to interception by the Hurricanes.


The Hurricane section leader in "G" decides to split his flight - he and his wingman in "H" will take on the Zeros while his third, less experienced pilot in Hurricane "I" remains free to attack the bombers. The leader (right) turns into PO1c Ashai for an attack from his 9 o'clock position but misses the high deflection shot. Meanwhile Watenabe is suddenly aware of .303 rounds whizzing past his Zero and Ashai's voice screaming in his earphones "Behind you Watenabe.....behind you.....break......now!!". He breaks right but not before Hurricane "H" manages to hit his Zero from astern, luckily only damaging him (red dot), but not enough to force Watenabe to return to the Akagi. (If I had rolled one higher PO1c Watenabe would have been shot down....a very close call). 


PO1c Watenabe's near death experience swiftly sharpens his situational awareness and he sees an opening....he throttles up in pursuit of Hurricane "H" as it turns away and easily manages to get on its tail. A quick burst and the Hurricane streams smoke and dives away on its back, the pilot bales out of the stricken plane....then its a quick jink to the left and he is postioned on Hurricane "G" 's rear quarter.....Watenabe fires another long burst and the second Hurricane falls away then explodes. He then rolls to the right to clear his tail... he scans the sky all round, but he doesn't spot any enemy aircraft.

Meanwhile PO1c Asahi manuveres against Hurricane "I" and damages it. The British pilot, an inexperienced newcomer, having seen the fate of his comrades, wisely decides to wing over and dive away rather than face 3:1 odds in his heavily damaged fighter. Asahi does not pursue him. 


 PO2c Fujimi positions himself to cover the leading flight of Vals, but no more British fighters appear to defend the port, allowing the Vals to attack their targets completely unhindered apart from some desultory AA fire. They manage to destroy their assigned targets, and all aircraft return to Akagi fully intact apart from PO1c Watenabe's somewhat bullet ridden Zero.   

Result - Japanese victory. The D3A2 Vals inflict 26 points of damage, which is enough to destroy all the assigned targets without the need for further strikes against Trincomalee.       

Kills - PO1c Watenabe - 2 Hurricanes, confirmed, PO1c Ashai - 1 Hurricane, damaged, PO2c Fujimi - none. 

As the strike returns to Akagi word is received from the B5N2 Kate search planes that have been sent out to locate any enemy forces that at least one British carrier has been sighted....

Monday 25 January 2021

Operation C - Cruisers 2nd Wave

Time - 5.30pm April 5th 1942

Scenario - Cruisers 2nd Wave - The tired shotai pilots, now on their fourth mission of the day must escort a further strike of 6 B5N2 Kate torpedo bombers as they try to finish off two British heavy cruisers that have sortied from Columbo to meet up with the main body of Admiral Somerville's Eastern Fleet.

Victory Conditions - In order to attack the targets the two bomber flights must fly the length of the playing board. The Kates are each armed with a single 18" torpedo. Each one that survives inflicts 1D6+3 points points of damage (Japanese aerial torpedoes were very effective at this time) on the target. If the total damage inflicted exceeds 25 points the target is considered to be destroyed. The first wave attack only scored 15 points of damage.


As the sun slowly settles in the west CPO1c Honda can see more British fighters orbiting over the two damaged cruisers. One section peels off and heads for his part of the attacking force...but they are not the sharp nosed in-line engined Sea Hurricanes or Fulmars he has become used to dueling against....instead they are squat, snub-nosed fighters powered by a big radial engine...American built F4F Wildcats, or Martlets in FAA parlance....

The three Zeros race to meet the Martlets before they can intercept the Kate torpedo bombers....CPO1c Honda wants no repeat of what happened in the last mission....


They manage to head off the Martlets and CPO1c Honda goes head to head with the British section leader as they merge, but no hits are scored by either side....


Using the manuveribility of his Zero to best advantage Honda manages to tail the leading Martlet, damaging it severely before banking away to the right (red dot at bottom). His wingman PO1c Ashai banks right and manages to damage Martlet "B" while PO2c Watenabe misses unusally misses a high deflection shot at the trailing British fighter.


The British flight leader's Martlet streams smoke and flame, so he turns away to try to return to his carrier at wave top height. Martlet "B" is flown by a veteran pilot and he sees a chance suddenly open up as Honda's Zero flashes past......the Zero pilot has made a fatal mistake leaving his tail open to attack. The Martlet pilot throttles up and banks hard right onto the Zero's 6 o'clock.....50 cal slugs chew up the lightweight Zero like a buzzsaw and the fighter explodes in a bright orange fireball.....CPO1c Honda has fallen! 

"Nooooo......" screams Ashai over the radio as he looks back to see his flight leader's aircraft disintegrate. Watenabe contains his own thoughts for later, as things get a whole lot worse for the two remaining Zero pilots...."Ashai.....stay calm.....there are more enemy fighters coming, but we must protect our comrades".        


PO1c Ashai takes a deep breath and turns in pursuit of Martlet "B" with a slick Immelmann turn which puts him on the Britisher's tail, but he can only damage it again before he switches onto Martlet "C" 's tail, hitting and damaging him. Martlet "C" however continues the fight, turning in to attack Kate "C" from its 3 o'clock. fortunately for the Japanese the attack fails.     PO2c Watenabe is now a driven man as he turns hard in pursuit of Martlet "B" and gets on his tail.....the sturdy fighter has taken a lot of punishment already so when its hit again the pilot bails out, giving Watenabe his 6th kill.  

Trouble for the Kate's however is not far away as a flight of Sea Hurricanes comes diving down towards them (Top left). Ashai and Watenabe are to the right of the leading Kate flight while the remaining FAA Martlet ("C") is handily positioned to attack the second flight of Kates.....


The Japanese fighters do their best to protect their charges but they are outnumbered 2:1. PO1c Ashai pursues the last Martlet ("C") and shoots it down with a raking burst from astern, so the second Kate flight is safe for the moment. PO2c Watenabe faces off with the Sea Hurricanes, but they avoid him sucessfully.....


The FAA fighters use their energy wisely and rip into the leading flight of Kates....Sea Hurricane "A" is flown by a junior ace who first fires a burst into Kate "B", badly damaging it and forcing it to return to the Akagi immediately. He then moves on to fire a long burst into Kate "C" which just explodes as he turns away, meanwhile his wingman in Sea Hurricane "B" runs parallel with his leader and fires at Kate "A" which wings over and dives into the sea.....in one move half the Japanese strike aircraft have been absolutely decimated !!

At this stage of the fight I was joined by our cat Dougal who first took a long relaxed look from my knee at what I was up to.......


and then gave me a bit of advice on how to roll decent dice scores......


Back on the table PO1c Ashai wings over hard right and rakes Sea Hurricane "A", but only damages him. In a nifty show of aerobatics PO2c Watenabe Immelmann's onto Sea Hurricane "B" 's tail, damaging him, then powers on to attack Sea Hurricane "A" from dead astern causing more damage. The British flight leader elects to head back to his carrier in his seriously damaged fighter (two red dots, top), but his wingman in Sea Hurricane "B" (red dot, centre) spots more Kate's dead ahead and elects to make a pass at them before retiring.   
Meanwhile Sea Hurricane "C" makes a pass at the previously damaged Kate "B" as it tries to exit the fight, but misses an easy kill (bottom).

Watenabe now half loops for a high deflection shot at Sea Hurricane "B" but misses, while Ashai also shoots at Sea Hurricane "B" but misses as he zooms by, then repeats his action with Sea Hurricane "C".....this allows Sea Hurricane "B" to attack Kate "E" head on, resulting in yet another Japanese strike aircraft being shot down! Sea Hurricane "C" however cannot reach the torpedo bombers as he tries to disengage, instead he finds himself rapidly closing with PO2c Watenabe's Zero.....as the two aircraft merge he sees hits on the Japanese fighter, but his own aircraft is hit repeatedly, forcing him to bale out.


PO1c Ashai goes after the last remaining enemy fighter from its reat quarter, but only damages it, but PO2c Watenabe then comes barreling in from directly astern and finishes the hapless Sea Hurricane off for yet another victory.

Result - Japanese victory.....Just!. Somehow the 2 remaining B5N2 Kates inflict 10 further points of damage, which with the 15 points from the first strike is just enough to sink the British cruisers.       

Kills - CPO1c Honda - None. Killed in Action 5/4/1942, PO1c Ashai - 1 Martlet, confirmed, PO2c Watenabe - 1 Martlet, 2 Sea Hurricanes, confirmed. 

Only four aircraft from the strike return to the Akagi in the evening twilight as the damaged Kate ("B") did not make it back to the carrier.....While the British cruisers were finally sunk the cost of the two missions has been very high, especially to Akagi's torpedo bomber squadron, which lost no less than seven out of twelve aircraft dispatched. 

The mood on the carrier is sombre and the two remaining Zero pilots are devastated over the loss of their flight leader CPO1c Honda. After their debriefing they are ordered to report to the fighter squadron commander's office space. 

The Lieutenant informs them that in line with IJN tradiiton for his good service to Japan CPO1c Honda has been posthumously promoted to the rank of Warrant Officer. He then congradulates PO2c Watenabe on his impressive tally and informs him that he will be advanced to PO1c immediately. Given his natural ability Watenabe will also become the new Shotai leader, at least for the rest of Operation "C". A new pilot will also join the shotai to bring it up to stength. PO2c Fujimi joined the Akagi just before she sailed and is classed as a newbie having just graduated from flight school.     

Admiral Nagumo orders the carriers to withdraw to the South East of Ceylon to refuel and rearm for two days before returning to launch a final attack on the other British naval base on Ceylon, at Trincomalee, at dawn on 9th April 1942.      


Saturday 23 January 2021

Operation C - British Heavy Cruisers Sighted

Time - 2.30pm April 5th 1942

Scenario - British Heavy Cruisers Sighted - The Shotai must escort a strike, this time consisting of 6 B5N2 Kate torpedo bombers, as they attack two County Class heavy cruisers that have sortied from Columbo to meet up with the main body of Admiral Somerville's Eastern Fleet which is beileved to be operating somewhere to the South West of Ceylon.

Victory Conditions - In order to attack the targets the two bomber flights must fly the length of the playing board. The Kates are each armed with a single 18" torpedo. Each one that survives inflicts 1D6+3 points points of damage (Japanese aerial torpedoes were very effective at this time) on the target. If the total damage inflicted exceeds 25 points the target is considered to be destroyed. 


After move 1.....a flight of 3 Fleet Air Arm Fulmar fighters (Bottom left) from one of the Eastern Fleet's carriers manuvere to attack the Japanese strike aircraft (Centre) which the fighter shotai from Akagi must try to prevent...


With a surprising burst of speed (rolled a 6 and is piloted by a FAA junior ace no less)
Fulmar "C" easily ignores the Japanese Zeros and bores in to attack the leading Kate flight. The concentrated fire of the Fulmar's eight .303in Brownings rips into the flight leader (Kate "A") which spews flame and dives vertically into the Indian Ocean below. The other two Fulmars fall far behind and are unable to support their impetuous comrade. 


CPO1c Honda must act fast to protect his charges.....he wings over and gives chase, managing to get on Fulmar "C" 's tail, but misses a straightforward shot. PO1c Ashai plays his role of Honda's wingman to perfection once again. As Honda rolls away to the left Ashai replaces him, hitting but only damaging the British fighter (red dot at the bottom of the picture, which I took after the British fighters moved.....). Meanwhile Fulmar "C" tries a head on attack against Kate "E" in the second flight but misses.  PO2c Watenabe engages with Fulmar "B", trying a high deflection shot that misses (I was rolling a lot of very low scores on everyones dice rolls at this stage :) ).


CPO1c Honda half loops to check where the enemy fighters are now, while PO1c Ashai manages to get into a shooting position on Fulmar "C" for the second time, but this time he misses completely. PO2c Watenabe is fast becoming aware that he is a natural fighter pilot as he effortlessly slips in behind Fulmar "B" 's tail and fires, but in line with his comrades eariler results this time the British fighter is only damaged (red dot bottom left).

While the Fulmars may not match the speed and manuveribility of the nimble Japanese Zeros they now prove that in the right hands they can be more than a match for any enemy strike aircraft......Fulmar "A" bores in on the second Kate flight leader (Kate "D"), downing it with a long burst, while the junior ace flying Fulmar "C" rolls in just behind Kate "E", which explodes  under a hail of .303 rounds to give that pilot his second victory over a Kate in this fight.....the Japanese strike is now in real trouble, with 3 out of 6 Kates having been shot down for no losses to the FAA fighters so far.....


But the pendulum is about to swing against them.......CPO1c Honda throttles up and turns sharply onto Fulmar "C" 's 6 o'clock, but he only damages him (Second red dot top left) before breaking to the right to allow PO1c Ashai to once again saves the day. Ashai sees his rounds impact on the Fulmar's wings and it spirals down to ditch in the water below (in these rules no aircraft can take 3 hits and survive). 

PO2c Watenabe meanwhile pursues Fulmar B, making a easy right turn and latches onto the British fighter's tail. Calmly he lines up and fires.....tracers impact the length of the enemy aircraft which wings over and plunges vertically into the sea......that's kill number 5 for Watenabe, he's done it....he is now offically an ace!!!


Suddenly Fulmar "A" is alone in the middle of a swerling mass of Japanese Zeros, the British pilot decides that he's seen enough and attempts to escape at wavetop height, but CPO1c Honda roars in from his rear quarter and quickly shoots down the last British fighter.     

Result - Partial Japanese victory. The 3 remaining B5N2 Kates inflict 15 points of damage in total, which is not enough to sink the British cruisers.       

Kills - CPO1c Honda - 1 Fulmar, confirmed, PO1c Ashai - 1 Fulmar, confirmed, PO2c Watenabe - 1 Fulmar, confirmed.  Watenabe has now scored five kills in one day.....he is now classed as a junior ace after his outstanding performance during 5th April.

Admiral Nagumo orders his tired aircrews to launch a further strike against the now crippled ships before nightfall. After that misson the carriers will withdraw to the South East of Ceylon to refuel and rearm before returning to launch a final attack on the other British naval base on Ceylon at Trincomalee at dawn on 9th April 1942....      


Tuesday 19 January 2021

Operation C - Attack on Columbo 2nd Wave

 Time - 10.00am April 5th 1942

Scenario - Attack on Columbo 2nd Wave - The Shotai must escort a further strike, this time consisting of 6 D3A2 Val dive bombers, as they try to finish off the already heavily damaged targets around Columbo Harbour.

Victory Conditions - In order to attack the targets the two bomber flights must fly the length of the playing board. Each bomber that survives gets to roll 1D6. The initial attack scored 20 points. If the total damage inflicted exceeds 25 points the target is considered to be destroyed. This time the defending RAF fighters will be already airborne to meet the second wave. As a random event at the beginning of each Japanese turn a check is made to see if any further fighters appear:

Roll 2d6. On a score of 10, 11 or 12 something arrives anywhere along a random table edge:

10 or 11: one further flight of RAF/FAA (as applicable) fighters arrive.

12: one further Shōtai of Japanese fighters arrives to assist.

As my dice rolling is at best medicore (as my good friend Paul will attest to :)) no reinforcements arrived in the first wave game for either side.....maybe things will change in this game.....  

Initial set up with the defending flight of RAF Hurricanes top left, two "vics" of D3A2 Val dive bombers in the middle and the Zero Shotai at the bottom right, not ideally positioned to get to the Hurricanes before they can mix it up with the Vals that the Zeros are supposed to be protecting.....


The Hurricanes begin to line up on the Vals as CPO1c Honda and PO1c Ashai leave Zero "C" flown by PO2c Watenabe well behind in their eagerness to engage the defending fighters....


Suddenly PO1c Ashai spots more Hurricanes!! "Enemy fighters
at 11 o'clock high...coming down....now" he calmly informs his flight leader over the radio*......now CPO1c Honda must make a choice......defend the bombers or face the enemy fighters diving straight at his flight? 

 * All IJN Zero fighters were equipped with radios by 1941/2. See https://j-aircraft.com/research/gregspringer/radios/radio_systems.htm


Without hesitation CPO1c Honda wings over and lines up a rear quarter shot on the central British fighter who is himself "bore sighted" on the leading Val. A quick burst and the hapless Hurricane explodes before the pilot can react!


PO1c Ashai arrives too late (Zero "B" bottom of picture) to stop the remaining two Hurricanes from diving through the Val flight and perfectly half looping onto their targets tails. The Val rear gunners ineffectually shoot at the two Hurricanes ("G" and "I") as .303 incendaries rip into the left hand Val ("B") which disintegrates. The right hand Val ("C") fairs a bit better, but is damaged (red dot), though not enough for the pilot to consider breaking off and returning to the IJN carrier force.

The second Hurricane flight now arrives and the leader in Hurricane "A" (centre right) fires at PO1c Ashai with a high deflection shot, seriously damaging Ashai's Zero. He turns his crippled plane out of the fight and begins the long flight back to the Akagi (centre left with red dot). Meanwhile CPO1c Honda (just in front of the Val 2nd flight leader, centre top) is able to manuver for a high deflection shot at Hurricane "I" damaging it ( right hand red dot) just as PO2c Watenabe finally enters the fight, damaging Hurricane "G"  as he tails it closely. Watenabe's opponent, an inexperienced "sprog"  turns for home and dives away, but the other British pilot, a veteran, is made of sterner stuff and stays in the fight. (The picture above, and the next one were only taken after all movement was completed).


The British second section leader in Hurricane "A" uses the energy built up in his dive to reach the second section of Val dive bombers. He looses off a long burst at Val "D" damaging it (yes I rolled another 1 ! :) )
enough to make it break off and return to base. 

CPO1c Honda and PO2c Watenabe are now facing no less than 4 Hurricanes between them. Undaunted Honda uses the speed and manuverabilty of his A6M2 Zero to best advantage, scoring hits on Hurricane C as he flashes past, then deftly performs a perfect Immelmann turn to attack again from its rear quarter, which scores more hits. Unfortunately for Honda only his two 7.7mm machine guns appear to be working now, as the rugged Hurricane keeps flying, but at least he's forced the British pilot to break off. Meanwhile PO2c Watenabe risks a high speed head to head run at Hurricane "G" which is attempting to line up on the second section of Vals. Both pilots score hits as they flash by but again no fatal damage is inflicted yet....Watenabe's new found confidence as a combat pilot allows him to continue, and he calmly half loops onto his opponent's tail. Another quick burst and the already smoking Hurricane explodes in front of him for his third kill of the day.


As the two damaged Hurricanes ("C" and "I") dive away (top and left) the British second section leader in Hurricane "A" moves against the Vals. He hoses a quick shot at Val "D" that has broken off, damaging it again (second red dot), but somehow it keeps flying, then jinks left to try a shot at Val "F" but misses. Meanwhile Hurricane "B" closes in as well. CPO1c Honda moves in once again to protect his remaining charges. He can only get into a high deflection shooting postion on Hurricane "A"s 9 o'clock, but its good enough as he somehow unjams his 20mm cannon and sees his rounds slam into the opposition fighter, destroying it completely.

Hurricane "B", flown by a regular pilot suddenly finds himself alone in the middle of the Japanese formation. He can see some of his squadron mates diving away behind the formation and remembers the advice from his squadron intellgence officer at the breifing they received before take off....hard learnt lessons from the campaigns over Malaya, Java and Sumatra. The advise is simple but very true...."DON'T get into a turning fight with a Japanese fighter, instead use your energy and fight in the vertical plane using dives and zoom climbs". So he decides to dive through the second formation of Vals, shooting as he goes before diving away to low level to escape. He pulls round and fires at Val "F", but misses. The two remaining Zero pilots are still vigilant of their bomber charges and CPO1c Honda dives after the speeding Hurricane and gets on his tail, but nothing happens when he pulls the trigger...he must be out of ammo (Yes I rolled yet another 1!) so he breaks right to let PO2c Watenabe continue the pursuit. Watenabe's Zero, although damaged, surges forward and he finds himself postioned for a rear quarter shot which he takes, sending the Hurricane into a vertical dive. As he pulls up Watenabe flashes by the British pilot as he bails out just in time. Watenabe smiles to himself.....one more kill and he will officially be rated as an ace!

Result - Japanese victory. The 4 remaining D3A2 Val's bomb their targets around Columbo harbour  inflicting a further 16 points of damage, making 36 points in total, which is enough to completely destroy the assigned targets.    

Kills - CPO1c Honda - 2 Hurricanes, confirmed. PO2c Watenabe - 2 Hurricanes, confirmed. For the second time in a row PO2c Watenabe has scored two kills in one mission.....he now has scored 4 kills in one morning, so he will now be classed as a Veteran pilot after his outstanding performance during the last two missions.

As they land back on the Akagi CPO1c Honda spots his wingman PO1c Ashai watching from the carrier's island. Thankfully he made it back in one piece. During the afternoon news comes through that elements of the British Eastern Fleet have been spotted south west of Ceylon. As the flight deck party labour to range the air group on deck for its next mission the aircrews are briefed in their squadron ready rooms about their new targets - two County Class heavy cruisers have been spotted heading south at high speed to join up with Admiral Somerville's main fleet.....


Sunday 17 January 2021

Operation C - Attack on Columbo 1st Wave

 Time - 8.30am April 5th 1942

Scenario - Attack on Columbo 1st Wave - The Shotai must escort a strike of 6 B5N2 Kates armed as level bombers as they attack targets around Columbo Harbour.

Victory Conditions - In order to attack the targets the two bomber flights must fly the length of the playing board. Each bomber that survives gets to roll 1D6. If the total damage inflicted exceeds 25 points the target is considered to be destroyed. If less than 25 points are scored then a further attack is required to destroy the target, but any damage inflicted in the intial strike is culmlative. As the Japanese met their victory conditions in the previous scenario the defending RAF fighters can only be scrambled once the attackers appear overhead. They take 3 turns to climb to altitude before they can manuvere against the Japanese aircraft. 


Turn one positions, showing the two flights of B5N2 bombers and the Japanese fighters to the right and the defending CAP of RAF Hurricanes at the bottom left with a dice counting down the number of turns left to climb to altitude.

By turn 4 the Japanese Zeroes are closing fast with the defenders, who are now able to react to them. Meanwhile the heavily leaden bombers drone across the board at 3 squares per turn....


PO2c Watanabe, keen to show CPO1c Honda his vigour to attack, streaks out ahead of his comrades. The British section leader in Hurricane "G", a regular pilot, decides to try and use his aircraft's strengths by engaging PO2c Watenabe in a head on pass as he angles towards the Japanese bombers......both pilots score hits (6's on red and white dice) but the Hurricane is destroyed while Watenabe only receives minor damage (black dice) and so elects to continue his mission accordingly. 


 The second RAF  pilot in Hurricane "H" (a junior ace no less) tries the same tactics with Watenabe as he tries to approach the Japanese bombers but this time both pilots miss. Before he can get to the bombers CPO1c Honda also intervenes in a third head to head encounter. He manages some hits on  Hurricane "H", damaging it (red dot), but just avoids the Hurricane's return fire. 


CPO1c Honda and PO1c Ashai try desperately to prevent Hurricane "H" from reaching the lumbering Kates. Honda half loops on its tail causing further damage (two red dots). Meanwhile PO2c Watenabe engages the last Hurricane ("I")  with a high defection shot from 3 o'clock, shooting it down. In the space of a few minutes he has transformed from a newly arrived "sprog" to a competant fighter pilot with 2 kills to his name.

The British junior ace in Hurricane "H" is not to be denied a shot at the bombers as he attempts to dive through the formation and outpace the pursuing fighters. He fires a burst at Kate "B" (hidden under Ashai's Zero "B" in the above shot) but misses. To his cost the nimble pursuing Zeros easily keep pace, and PO1c Ashai is soon on his tail. A quick burst seals the fate of the heavily damaged Hurricane and the RAF pilot is forced to bail out.

Result - Partial Japanese victory. The 6 B5N2 Kate's bomb their targets around Columbo harbour but only inflict 20 points of damage in total, so a further strike will be required to completely destroy them.    

Kills - PO1c Ashai - 1 Hurricane, confirmed. PO2c Watenabe - 2 Hurricanes, confirmed. He will now be classed as a Regular pilot after his outstanding performance during this sortie.